CHAPTER 4: PROGRESSIVE ENHANCEMENT WITH JAVASCRIPT
“I don’t want to use a tool unless I’m going to use it really well. Doing any of these things halfway is worse than not at all. People don’t want a mediocre interaction.”
On February 7th, 2011, shortly after Gawker Media launched a unified redesign of their various blogs (Lifehacker, Gizmodo, etc.), users visiting any of those sites were greeted by a blank stare (see Figure 4.1). The new platform relied entirely on JavaScript to load content into the page and an error in that JavaScript code made any page request come up empty-handed.[1] That single error caused a lengthy “site outage” (I use that term liberally because the servers were still working) for every Gawker property and lost them countless page views and ad impressions. And it could have been avoided, had they designed their new platform using progressive enhancement.
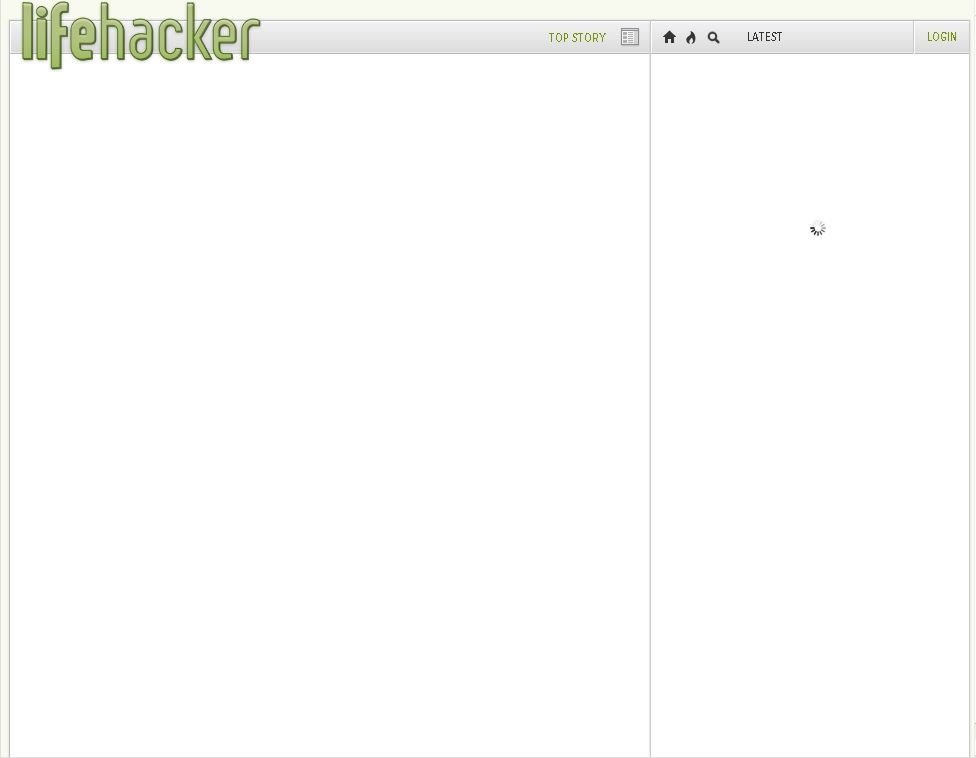
Figure 4.1: Lifehacker. Empty.
Nothing really makes a web page sing quite like JavaScript. With it, you can create rich interactions, build dynamic interfaces, and so on. Web developers realized this early on. They jumped at the opportunity to wield this powerful tool to build more engaging web pages, validate form data, and more. For today’s JavaScript developers, it’s easy to make something amazing and stick to the progressive enhancement philosophy, but it wasn’t always that way.
Back in the mid-to-late ’90s, coding JavaScript was like practicing a dark art. For every bit of spaghetti code we had in our HTML, it was usually ten times worse in JavaScript because the two dominant browsers at the time, Netscape and Internet Explorer, each had their own implementation of the language[2] and they differed just enough to make the really interesting stuff incredibly gnarly to write. For example, finding the same element (e.g., #location) in the document (technically the Document Object Model or DOM) required two incredibly different syntaxes:
document.layers['location']; // Netscape
document.all['location']; // IE
This unfortunate reality required us to essentially write every script twice, or at least fill it with “forks” (alternate paths for a script to take, based on the browser) that came back to “fork” us in the end.
As we discussed in Chapter 2, the late ’90s was a period of great turmoil on the web: the browser wars. With each new release, Netscape and Microsoft offered up new goodies for developers to use, hoping to capture a greater share of the browser market. This one-upmanship created a lot of problems for developers; with the two competing implementations of JavaScript, we spent so much time trying to even out the discrepancies that we didn’t pay attention to how the language functioned or learn the best way to integrate it with HTML and CSS.
When the European Computer Manufacturers Association (ECMA) International standardized JavaScript[3] and the W3C released its DOM spec, the shifting sands beneath our feet were finally replaced with a solid foundation and we were able to start figuring out better ways of doing things:
// Unified DOM
document.getElementById('location');
GETTING OUT OF THE WAY
One of the first lessons we learned when the dust settled was that JavaScript was not a panacea for interaction on the web. In fact, it wasn’t even all that reliable.
First off, even after the W3C standardized the DOM and the browsers generally agreed to support web standards, not everyone was reading from the same playbook; there were enough differences between implementations that it was simply impossible to make any assumptions about the availability of certain methods (such as the lynchpin DOM traversal methods document.getElementById(), which provides access to elements based on their id or document.getElementsByTagName() which, you guessed it, finds elements based on their name). Secondly, even if a browser did have full JavaScript support, the user (or her IT administrator) still had the final say over whether or not JavaScript was even allowed to run.[4]
Over time, we realized that JavaScript support was not a given and we began to re-factor our code, making it cleaner, more maintainable, and more flexible to deal with the availability (or absence) of JavaScript. Let’s examine the thinking during that period to better understand how to use JavaScript progressively.
Warning: From here on out, we’ll be diving into actual JavaScript code. If you have not worked much with JavaScript before, have no fear, I’ll do my best to explain what’s happening at every step of the way so that you can follow along, even if the code reads like Sanskrit to you.
100% reliance
Back in the early days of JavaScript, it was not uncommon to write (or at least see) onclick event handlers (scripts executed when someone clicked an element on the page) adorning otherwise useless links.[5]
<a href="#" onclick="newWin( 'http://easy-designs.net/' );">Easy! Designs</a>
With JavaScript enabled, this link calls a custom function named newWin, passing it a value of “http://easy-designs.net/.” That function, in turn, opens that URL in a new window. Without JavaScript, however, the link wouldn’t do anything because, as you’ll recall from our discussion of identifiers in Chapter 2, the href points to an empty id. What’s the point of a link that won’t work without JavaScript?
Which brings me to my first maxim for progressive enhancement with JavaScript:
Make sure all content is accessible and all necessary tasks can be completed without JavaScript turned on.
This link obviously violates that (as does the Gawker platform I mentioned earlier), but so did the vast majority of JavaScript in use on the web by the end of the ’90s. At that time, the web was lousy with sites that required JavaScript and places where it got in the way of users; in other words, where JavaScript was obtrusive. Realizing this problem, web developers began to push for “unobtrusive” JavaScript.
Note: I’m not advocating the use of popups or using JavaScript to open new windows as they introduce a number of accessibility and usability issues. I have, however, chosen this as an example because it illustrates the evolution of our JavaScript code in a manner that’s relatively easy to follow. Rest assured, the lessons you’ll learn by following this example are universally applicable to any other JavaScript-ing you might do.
Becoming unobtrusive
Unobtrusive JavaScript is a catch-all term for programming in a manner that is not reliant on JavaScript. Under this paradigm, users are given access to all page content and can accomplish every necessary task on a page using the basic building blocks of the web (HTML and the HTTP protocol). JavaScript is then layered on to enhance the page.
Sound familiar? Unobtrusive JavaScript is an idea that meshes perfectly with progressive enhancement philosophy because it forces JavaScript into the role of functional enhancement, as opposed to absolute requirement.
With unobtrusive JavaScript in mind, we re-factored our links to work whether JavaScript was available or not:
<a href="http://easy-designs.net/" onclick="newWin( this.href ); return false;">Easy! Designs</a>
In this revision, the link actually points to a URL so it will function without JavaScript. When JavaScript is available, however, clicking the link will call newWin, which is passed the value of the link’s href attribute (the DOM value this.href). The other key difference between this and the previous version of the link is that the onclick event handler is also set to “return false,” which cancels the click event’s default action (in this case, following the link to a new page).
This was a great first step to address the potential absence of JavaScript, but we soon realized there were better ways to manage scenarios like this.
More maintainable
The next step in the evolution of this code involved using the age-old rel attribute (which you’ll recall from Chapter 2) to migrate our inline JavaScript code to an external file. This provided two benefits: 1) it gave an additional semantic meaning to the link and 2) it made maintaining websites much easier because developers could change a single JavaScript file and affect the entire site (which is the exact argument we made for external stylesheets over inline use of the style attribute). Here’s the new HTML:
<a rel="external" href="http://easy-designs.net/">Easy! Designs</a>
From there, it’s fairly simple to apply the click event to this and any other “external” links:
var links = document.getElementsByTagName( 'a' ),
    rel, i = links.length;
while ( i-- )
{
  rel = links[i].getAttribute( 'rel' );
  if ( rel && rel.match( /\bexternal\b/ ) )
  {
    links[i].onclick = function()
    {
      newWin( this.href );
      return false;
    };
  }
}
If all those “ifs” and “whiles” are Greek to you, here’s a quick summary of what the script does: it collects all of the links on the page and loops through them (in reverse order which, oddly enough, is a bit faster than going forward); and if the link has a rel attribute and its value contains the text “external,” the link’s onclick event is assigned an anonymous function that calls a function named newWin (passing it the value of the link’s href attribute just like in the previous example) before canceling the click’s default action by returning false.
Finally, we’d come upon a decent solution that was just about as unobtrusive as you could get and, in 2006, Jeremy Keith gave us a lovely little name for it: Hijax, a clever combination of “hijack,” referring to the fact that the link’s normal behavior was being commandeered, and Ajax, the JavaScript-based mechanism by which web pages could interact with a server without requiring a refresh in the browser. Little did we know, Ajax, which was just growing in popularity at the time, would show us we still had a thing or two to learn when it came to JavaScript event management.
Truly flexible
With the widespread acceptance and implementation of Ajax techniques[6] and other methods of modifying page content on the fly, our age-old method of assigning event handlers wasn’t holding up all that well. After all, if new content was injected into the page with a link marked rel="external", it wouldn’t have our custom function assigned as an onclick event handler. This is because our script was likely run when the page loaded (window.onload()) prior to the new link being injected via Ajax.
This presented a tough problem to be sure. In this scenario, it was possible that two links that should act the same would actually act in completely different ways. Can you say usability issue?
To address this issue, some folks re-executed the script whenever an Ajax-based HTML injection was completed. It seemed like a good idea, but calling the same function over and over again slowed the browser down considerably because it had to traverse all of the links on the page each and every time.
Then Christian Heilmann reminded us that any event triggered on a particular element actually traverses the DOM tree from the root node (html) to that element and back again in the event capturing and bubbling phases, respectively.[7] That means the “click” event on a link is actually executed on every element between the root node and the link itself… twice[8] (see Figure 4.2). Listening for the event on an element further up the DOM tree is not only more efficient (because you could assign a single event handler rather than hundreds), but it made it possible to trigger actions on dynamic content, thereby helping us overcome the potential usability issue where similar links behaved differently.
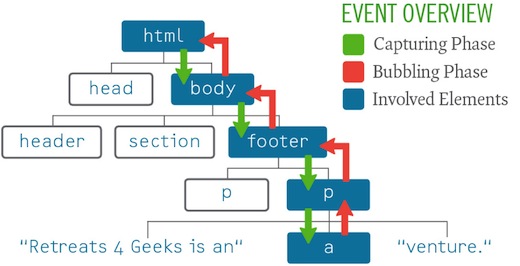
Figure 4.2: Event capturing and bubbling.
This concept became known as “event delegation” because a single event handler could interpret events and send out orders based on the element that triggered that event. Here’s a concise rewrite of the previous example that uses event delegation:
document.body.onclick = function( e )
{
  // even out the event models
  e = ( e ) ? e : event;
  var el = e.target || e.srcElement, rel;
  // external links
  rel = el.getAttribute( 'rel' );
  if ( el.nodeName.toLowerCase() == 'a' &&
       rel && rel.match( /\bexternal\b/ ) )
  {
    newWin( el.href );
    // cancel the default action
    if (e.preventDefault) {
      e.preventDefault();
    } else {
      e.returnValue = false;
    }
  }
};
This code block assigns an event handler to the onclick event of the body element, establishing the listener; within the listener, it determines the target element (the one that was clicked) and then checks to make sure it’s an anchor element (a) that has a rel attribute containing the string “external”; if the element meets all of those requirements, the newWin function is called and the event’s default action is canceled.
This example, while specific, demonstrates why we must continue to evolve our approach to JavaScript-based interactions. Improving our JavaScript comprehension provides direct benefits for progressive enhancement by helping us make our code smarter and more unobtrusive, but it also helps us in terms of maintainability and performance.
MAKING WHAT WE NEED
By now you’re probably getting the gist of unobtrusive JavaScript, but we’ve only been looking at the user experience from the document side of things. There are numerous ways in which JavaScript-based interactions are far superior to those without it. Client-side form validation, for instance, provides the opportunity to give users immediate feedback on potential errors without requiring that they submit the form first.
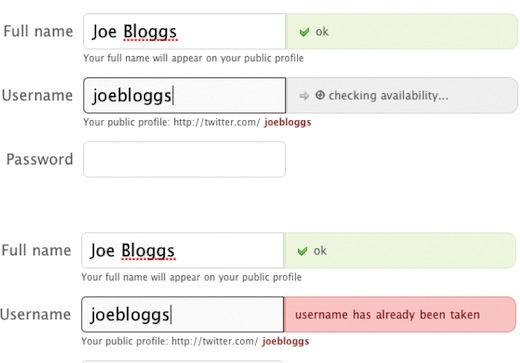
Figure 4.3: Checking username availability on Twitter.com.
As we’ve seen, we need to be careful to make sure that every interface can work without JavaScript, but what about when JavaScript needs additional markup to achieve its goals? Well, that brings us to my second maxim for progressive enhancement with JavaScript:
Use JavaScript to generate any additional markup it needs.
JavaScript is really good at generating and modifying markup on the fly. So when you need to enhance an interface with JavaScript, start with a baseline of semantic, usable markup and baseline styles. Then instruct the script to make necessary HTML and CSS changes required by the new interface once it has determined that it can run without encountering errors.
For an example of this in action, let’s return to the Retreats 4 Geeks page.
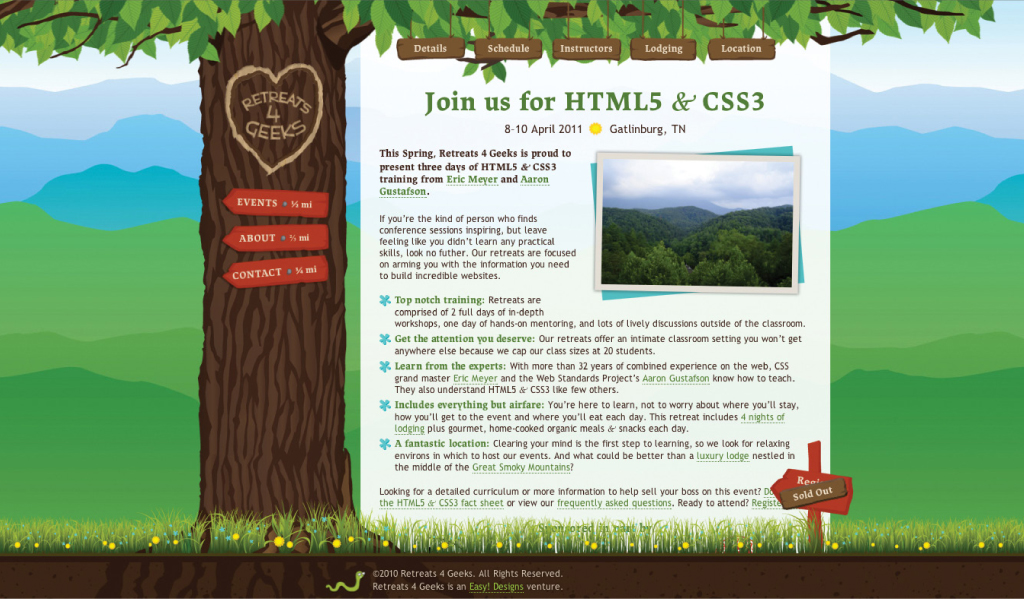
Figure 4.3: The Retreats 4 Geeks web page.
I wanted to make the best possible use of space on a mobile device. The horizontal navigation will work on a small browser, but the target areas would be too small to click easily. Of course, I could switch the site to use vertical navigation, allowing for larger links, but that would take up precious screen real estate.
An alternative to these two approaches is creating a dropdown using either CSS or a select element. While the pure CSS dropdown option is tempting, the latter approach has an edge because it provides users with a familiar user interface. For that reason, I chose the select route.
Based on the markup introduced back in Chapter 2, I’ll walk you through creating a script that converts the contents of the nav element into a select when the browser shrinks below a particular size. To keep the example short and a little easier to follow, I’ve used the jQuery JavaScript library.[9] Libraries are great tools as they are composed of dozens if not hundreds of functions that solve common problems (like adding and removing classes). Don’t worry if you can’t completely follow the code, I’ll explain what’s happening so you don’t have to decipher it on your own.
We’ll begin by isolating the script in an anonymous function[10] that runs as soon as the DOM is available, but before assets like images, CSS files, and videos have been downloaded (a.k.a. onDOMReady). This makes the page more responsive than running a script when the window loads (a.k.a. window.onload). For the remainder of this example, all of the code will be sequestered within this function:
$(function(){
  // Exciting stuff will go here
});
Next, we create the variables we need for this script to work. By instantiating them all at once, we’ll reduce the number of var statements (which helps with minification).[11]
var
// reference the window
$window = $(window),
// get the navigation
$old_nav = $('#top nav > *'),
// get the links
$links = $old_nav.find('a'),
// track what’s showing
showing = 'old',
// the browser width that triggers the change
trigger = 765,
// we’ll use these shortly
$new_nav, $option,
// we’ll need a timer too
timer = null;
The comments should give you a good sense of what each variable is for.
If you’re familiar with jQuery, but confused as to why we’re assigning elements to local variables rather than just referencing the jQuery-based lookup (e.g., $('#top nav > *')) each time we need it, rest assured that there’s a method to my madness: creating a local reference reduces the performance hit of running the script because the look up only happens once instead of every time $() is used. Also, to make it easy to differentiate jQuery results from other variables, I’ve prefaced each associated variable name with a dollar sign ($). You’ll see these techniques used throughout this script as they are helpful habits to get into.
With all of our variables in place, you might think we could move on to the meat of the script, but we’re not quite ready for that yet. Before we try to execute code against the page, we should make sure that the elements we need actually exist:
if ( $old_nav.length && $links.length )
{
  /* We know the DOM elements we need exist and can do something with them */
}
Testing for dependencies is very important and is something I’ll cover more thoroughly in the next section. Now for the meat (or nutmeat if you’re a vegetarian). We’ll begin our script in earnest by generating the new select-based navigation, creating the select, and the first of several option elements it will contain:
$new_nav = $('<select></select>');
$option = $('<option>-- Navigation --</option>')
            .appendTo($new_nav);
With new markup to work with, we can now loop through the links we collected (as $links) and build a new option for each by repeatedly cloning the option we just created:
$links.each(function(){
  var $a = $(this);
  $option.clone()
    .attr( 'value', $a.attr('href') )
    .text( $a.text() )
    .appendTo( $new_nav );
});
With the options created and appended to the select we can move on to adding the final markup touches and setting up the event handler for the select’s onchange event:
$new_nav = $new_nav
             .wrap('<div id="mobile-nav"/>')
             .parent()
             .delegate( 'select', 'change',
                        function(){
               window.location = $(this).val();
             });
This is a slightly simplified version of what you’ll find on the live Retreats 4 Geeks site (I’ve taken out some of the URL hash trickery), but I wanted to make sure you were able to follow it without distraction. Here’s what’s going on: the first three lines wrap our select ($new_nav) in a div and then re-assign that div to the variable $new_nav so the whole thing is viewed by JavaScript as a neat little package; the next line uses event delegation (which we discussed earlier) to observe the onchange event on the select from further up the DOM tree (from the div, in fact), assigning an anonymous function to that event that pushes a new location to the browser’s address bar (causing the browser to jump to the new section or load a new page, depending on the link type).
Boom! Functional select-based navigation. Now to get it into the page when conditions are right. For that, we’ll create a new function, called toggleDisplay, that will observe the size of the browser window and handle swapping one navigation style for another:
function toggleDisplay()
{
  var width = $window.width();
  if ( showing == 'old' &&
       width <= trigger )
  {
    $old_nav.replaceWith($new_nav);
    showing = 'new';
  }
  else if ( showing == 'new' &&
            width > trigger )
  {
    $new_nav.replaceWith($old_nav);
    showing = 'old';
  }
}
Again, this is a slightly simplified version of the final script, but it highlights the important part: the navigation is only swapped in the event that the appropriate browser width threshold is met (trigger) and the other navigation style is showing (tracked using showing). With that function in place, we just need to run it once (to initialize everything and make sure the right navigation is showing from the get-go) and then assign it to the window’s onresize event:
toggleDisplay(); // initialize the right view
$window.resize(function(){
  if ( timer ) { clearTimeout(timer); }
  timer = setTimeout( toggleDisplay, 100 );
});
If you’re wondering why toggleDisplay() isn’t passed in as the actual event handler, that’s because doing so would cause the function to be executed numerous times (possibly several hundred) while a user is resizing his or her browser. To keep the number of executions to a minimum (and reduce the burden the script places on a user’s CPU), the event handler uses a timer to call toggleDisplay() after .1 seconds. As the function is triggered repeatedly during a resize event, it destroys the timer if it exists and then recreates it. This setup ensures toggleDisplay() is only called once when a user resizes his or her browser (unless he or she does so very slowly).
And there you have it: a perfect example of progressive enhancement with JavaScript.
Figure 4.5: select-based navigation on an iPhone.
As this simple example demonstrates, JavaScript is perfectly capable of generating everything it needs and getting rid of anything it doesn’t. You could even take this particular function a step farther and make it even more markup agnostic by allowing the root starting point (in our case, the child elements of nav) to be passed dynamically into the function. But I leave that to you to experiment with. Onward!
KEEP IT COPACETIC
As we’ve covered, many of the progressive enhancement techniques available to us in HTML and CSS are pretty straightforward and may even have been part of your repertoire prior to picking up this book. Progressive enhancement with JavaScript, on the other hand, is a bit more complicated; JavaScript cannot be fault tolerant like the others because it is a programming language.
Unlike HTML and CSS, which describe content and provide design instructions to a browser, respectively, JavaScript literally executes commands to the browser. Because they actually do something, JavaScript programs stop running when they encounter an error. The potential causes for these errors could be anything from a typo to a missing dependency to accidentally writing an infinite loop. Regardless of the cause, if you write code that doesn’t jive well with the browser’s JavaScript interpreter, it will likely spit a big fat error right in your face (or your customer’s). And no one wants that.
As we’ve seen, the implementation of progressive enhancement at each stage in the continuum isn’t a binary choice of having a particular technology or not having it. Instead, a user’s experience at each level is variable based on the capabilities of the browser. So, if a user’s browser supports RGBa natively, but not rounded corners, it’s not a big deal; the user gets what she gets.
We need to approach JavaScript the same way; it shouldn’t be an all or nothing option. Not to keep returning to food metaphors time and time again, but we should offer technologies in an à la carte fashion by dividing up the functionality into discrete, self-contained packages. Once separated, these scripts can test for their own dependencies and judge whether or not they should run based on the browsing environment and the page they are to interact with.
The select-based navigation script we just walked through is a good example of the first part of this concept in practice; it is completely self-contained. It does not, however, properly test for its numerous dependencies, the first of which is the availability of jQuery. To do that, we would need to wrap the whole thing in a conditional:
if ( typeof( jQuery ) != 'undefined' )
{
  /* Existing code goes here */
}
In this brief bit of code, we are checking for the existence of the jQuery object, which is created when jQuery (the library) is present, by checking to see that its type is not “undefined.” Dependency testing is a useful strategy because it helps you avoid throwing errors in the browser and it can help speed up the user’s browsing experience by not executing code unnecessarily.
Here’s another simple example that may prove more familiar to you:
if ( document.getElementById )
{
  /* Code using document.getElementById() goes here */
}
In this case, we’re making sure the DOM traversal method document.getElementById exists before we execute code that uses it. You probably recall us using this strategy in the event delegation example when testing for event.preventDefault.
Returning to the jQuery test, we can take the test a step farther and check for a specific version of jQuery. This form of testing can be useful if your script uses a method not available in earlier versions of the library. In many cases, it’s smarter to test for the existence of specific methods, but version checking can be really helpful when a new release of the library substantially changes the API for a pre-existing method:
if ( typeof( jQuery ) != 'undefined' &&
     parseFloat( jQuery.fn.jquery ) >= 1.4 )
{
  /* Existing code that requires jQuery 1.4 or higher goes here */
}
Testing for dependencies is a great way to ensure you don’t execute code that could throw errors and, the earlier you test, the more memory and processing time you can save a user who won’t benefit from the script in the first place. jQuery isn’t the only dependency the script has though; as you may recall, we took its markup dependencies into account when we tested the lengths of both the $old_nav and $links collections:
if ( $old_nav.length && $links.length )
{
With this test in place, the script quietly exits when it has nothing to do and it doesn’t bother creating any new elements or assigning any event handlers that are destined to go unused.
Following on this example, you can likely see myriad scenarios where investigation into the browsing environment and the page setup can help a script to determine whether or not it should run. Object existence, markup dependencies, method availability, cookie availability, and Ajax support are all ripe for the plucking. It’s trivial to add code that allows a script to quietly turn itself off when any of its dependencies are not available, so there’s really no reason not to do it.
If you think about it, the concept of dependency testing is quite similar to using media queries in CSS. And, speaking of CSS, we should talk about how to best manage the interaction between scripts and style.
WORKING WITH STYLE
One script dependency we haven’t discussed yet is CSS. Nine times out of ten, if you are writing JavaScript that interacts with the DOM, you’re also working with CSS in one way or another. When developing with progressive enhancement in mind, it’s important to determine the best way to apply and control styles from within JavaScript so you don’t confuse your users by creating interfaces that don’t actually work. But more on that in a moment.
Over the years, our understanding of how JavaScript and CSS should interact has evolved considerably. In the early days of JavaScript, style management in a script was pretty much nonexistent; we just wrote everything inline by manipulating an element’s style attribute:
function highlight()
{
  var el = document.getElementById( 'message' );
  el.style.color = '#f00';
  el.style.backgroundColor = '#ffcfcf';
}
From a maintenance perspective, code written in this manner is a nightmare to work with. It means any time there’s a design change, you need to get someone who understands JavaScript involved. That’s hardly efficient and violates the separation of layers; mixing presentation and behavior makes both of them harder to work with.
The next step in the evolution was extracting the changeable bits to variables, either within the script itself or passing them in as part of a configuration object (keeping a sensible default in case the configuration was skipped):
function highlight( config )
{
  var el = document.getElementById( 'message' );
  el.style.color = config.color || '#f00';
  el.style.backgroundColor = config.backgroundColor || '#ffcfcf';
}
highlight({
  color: '#ebebeb',
  backgroundColor: 'black'
});
It still requires at least a cursory knowledge of JavaScript to update the strings, but hopefully all of the style rules would be in one place, so the maintenance should be a bit easier.
Eventually, however, we realized it was much more efficient to maintain style information in an external stylesheet and trigger it by manipulating the class of an element on the page:
function highlight()
{
  document.getElementById( 'message' ).className += ' highlight';
}
Not only did this reduce the amount of code necessary to accomplish the desired effect, but it also meant fewer DOM manipulations (which increased performance tremendously) and it meant the CSS could be maintained without modifying the JavaScript that would be interacting with those styles.
I’m going to forgo a discussion of the different ways you can bundle your scripts and styles together while still maintaining a decent amount of separation, in favor of spending some time on when and how to best apply styles using a script. While the former is certainly an interesting topic,[12] the route you choose to go has more to do with your work flow and overall project needs. When and how your scripts apply styles, however, is of critical importance and is the subject of my final maxim for progressive enhancement with JavaScript:
Apply no style before its time.
As we’ve already covered, most DOM scripting requires a bit of style modification as well—whether it’s to expand and collapse an element on the page, highlight newly added content, or provide visual flourishes to a drag and drop interface. Using style in this manner is perfectly legitimate, but, more often than not, developers apply styles that correspond to a given widget before they have determined if the widget can even run.
Let’s take, for example, an accordion widget. In a typical accordion interface, the content blocks are hidden and only the associated headings are visible. If the styles applied to hide the content sections were applied by default and the script was unable to run, a user would be unable to click a header to reveal the hidden content. The styles would have undermined the usefulness of the interface because they were applied too early.
If, on the other hand, the script itself were to trigger the application of the initial state styles when it knew it would be able to run, there would not be any problem whatsoever. If the script didn’t run, the widget-related styles would not be applied and the content would still be visible and, thereby, usable. Implementing the style application in this way, you provide one layout for the content when the widget can’t run and another set of styles when it can, optimizing both use cases.
Could it be? Why yes, I think it is. Progressive enhancement perfection.
Figure 4.6: An accordion widget showing the first section expanded and the other three sections collapsed. Clicking the title of another section will cause that section to expand and the first section to collapse.
One of the best ways to manage triggering interface styles like this is by using an “activator” class on the root element of the widget. Here are some quick examples:
| STRATEGY | “RESTING” CLASS |
“ACTIVATED” CLASS |
|---|---|---|
Add a suffix of “-on” to the base class |
.accordion |
.accordion-on |
Add another class |
.auto-submit |
.auto-submit.active |
Change the form of the class |
.replace-me |
.replaced |
Table 4.1: Using an “activator” class.
By following this practice, you can guarantee that no styles will be applied before they are needed.
Another issue with style application by JavaScript is the potential for collisions. Just as it is important to isolate your scripts from one another to avoid collisions in variable, function, or method naming, it is recommended that you isolate your script-related styles from others as well. After all, you may not be able to control what other class names may be in use on a given page (especially if you’re releasing a script for other people to use) and if you don’t carefully sequester your styles, they can unintentionally “bleed” onto the rest of the page (i.e., they might be applied to elements you didn’t intend them to apply to).
To corral your styles, it’s best to start every selector with an identifiable marker unlikely to be in conflict with another class or id on the page. I like to begin with the name of the JavaScript object. So, for example, if I built an accordion widget named (cleverly) AccordionWidget, I might classify the activated root element as “AccordionWidget-on” and then tree each of my styles from there:
.AccordionWidget-on .heading {
  /* Heading styles here */
}

.AccordionWidget-on .content-block {
  /* Content block styles here */
}

.AccordionWidget-on .content-block.collapsed {
  /* Collapsed content block styles here */
}
Obviously, there is an outside chance that style rules intended for content other than your widget could end up bleeding into the widget as well because of issues regarding specificity or the cascade. If you anticipate those potential issues, however, you can take the appropriate action by increasing the specificity of your selectors or by explicitly setting each and every property you want to control within your widget.
PLANNING AND RESTRAINT
Make no mistake, progressive enhancement with JavaScript requires considerably more effort than it does with CSS or HTML. With a bit of thoughtful reflection and consideration of the numerous factors that affect the web experience, however, it quickly becomes second nature. And, when in doubt, you can always come back to the three maxims:
- Make sure all content is accessible and all necessary tasks can be completed without JavaScript turned on.
- Use JavaScript to generate any additional markup it needs.
- Apply no style before its time.
Armed with a solid understanding of how to best wield the power of JavaScript, you’re sure to make smart decisions and build even more usable sites.